pgAgent
Dave Page
PostgreSQL Core Team member / EnterpriseDB
Introduction
pgAgent is a job scheduler for PostgreSQL, similar to Microsoft's SQL Server Agent. It's designed to run on a variety of operating systems, including Windows, Linux, Mac OS X, Solaris and FreeBSD and allows authorised users to schedule jobs consisting of one or more SQL or shell/batch steps. Common uses may include scheduled maintenance tasks - for example, archival of old records from a table, or vacuuming of certain tables, or operations that for part of an application such as batch posting of the days transactions to accounts.
Typically, a single instance of pgAgent will be installed on the database server itself, though in some instances it is beneficial to install one or more instances on machines other than the database server. Once installed, pgAgent may be managed using the pgAdmin graphical management interface for PostgreSQL, which supports over 20 languages for end users including English, French, German, Japanese, Korean and Chinese (simplified and traditional).
Installation
The source code for pgAgent can be downloaded from the PostgreSQL website, where you can also find pre-built binaries for Windows, Linux and Mac OS X. pgAgent is also included as a supported module in EnterpriseDB's Postgres Plus Standard Server distribution.
Building from Source
If you are using a pre-built binary or the Postgres Plus installer, you can skip this section.
Wherever possible, it is recommended that a binary distribution be used to avoid having to setup the build environment required by pgAgent, which can be time consuming. Because the code was originally written as a part of the popular pgAdmin tool, it requires most of the same libraries, the details of which can be found in the pgAdmin build instructions.
With a suitable environment configured, the cmake utility can be run to configure the source tree for compilation. Check the default options selected by cmake, as you may need to correct one or more of the paths. Once the Makefiles have been generated, it's a simple matter of running make to build the executable.
Installing the Binary
If you are using the Postgres Plus installer you can skip this section.
Once you have a binary, whether downloaded or manually compiled, it should be installed in a permanent location. This can be wherever makes the most sense for your chosen operating system. On Linux for example, we might install the binary in /usr/local/bin.
Database Configuration
If you are using the Postgres Plus installer, you can skip this section.
Before starting pgAgent the database must be configured. pgAgent stores all of its configuration and log information in the pgagent schema in the Maintenance Database on your server. This is the database that pgAdmin is configured to open its initial connection to. Perhaps the most common mistake that users make when setting up pgAgent is to install the pgagent schema in a different database with the result being that pgAdmin doesn't recognise the installation and allow it to be managed ? To avoid confusion, ensure you use the same database for everything: schema installation, pgAdmin Maintenance Database, and pgAgent connection string!
Run pgAdmin, and open the SQL Tool in the Maintenance Database (typically called postgres). From the File menu, select the Open option and then browse to the pgagent.sql file that accompanied your copy of the software. Click the Run button to create the schema and the various objects within it that pgAgent requires to operate. By default, only the user installing the pgagent schema will be able to schedule jobs (typically the DBA), but by adjusting the privileges on the pga_exception, pga_job, pga_step and pga_schedule tables, additional users may be granted the ability to add, remove or edit jobs, steps and schedules. This allows the DBA to delegate the ability to manage pgAgent to any user as desired.
Daemon Configuration on Unix
The next step is to configure pgAgent to automatically start at system boot time. On unix systems, this will typically involve creating a startup script which will be installed in a location such as /etc/init.d ? you should consult your operating system documentation for details of this step. pgAgent has a small number of command line options on Unix systems, most of which are only used in debugging modes:
Usage:
/path/to/pgagent [options]
- options:
- -f run in the foreground (do not detach from the terminal)
- -t <poll time interval in seconds (default 10)>
- -r <retry period after connection abort in seconds (>=10, default 30)>
- -s <log file (messages are logged to STDOUT if not specified)>
- -l <logging verbosity (ERROR=0, WARNING=1, DEBUG=2, default 0)>
The connect string required is a standard PostgreSQL libpq connection string. For example, the following command line will run pgAgent against a server listening on the localhost, using a database called postgres (our Maintenance Database, where the pgagent schema was created), connecting as the user postgres (who must have permission to SELECT, INSERT UPDATE and DELETE records from all tables in the pgagent schema):
/path/to/pgagent hostaddr=127.0.0.1 dbname=postgres user=postgres
A command similar to this should be incorporated into your startup script.
Service Configuration on Windows
On Windows, we can configure pgAgent as a service which will be started and stopped as appropriate by the Service Control Manager. The command line options are similar to those used on Unix systems, but include additional options to install or remove the service:
- Usage:
- pgAgent REMOVE <serviceName>
- pgAgent INSTALL <serviceName> [options] <connect-string>
- pgAgent DEBUG [options] <connect-string>
- options:
- -u <user or DOMAIN\user>
- -p <password>
- -d <displayname>
- -t <poll time interval in seconds (default 10)>
- -r <retry period after connection abort in seconds (>=10, default 30)>
- -l <logging verbosity (ERROR=0, WARNING=1, DEBUG=2, default 0)>
The service may be installed from the command line as follows (adjusting the path as required):
"C:\Program Files\pgAgent\pgAgent.exe" INSTALL pgAgent -u postgres -p secret
hostaddr=127.0.0.1 dbname=postgres user=postgres
(Note: Actually above is a command of one line.)
As in the Unix case, the user used to connect to the database must have permission to SELECT, INSERT UPDATE and DELETE records from all tables in the pgagent schema.
The service may then be started from the command line using net start pgAgent, or from the Services control panel applet. Any logging output or errors will be reported in the Application event log. The DEBUG mode may be used to run pgAgent from a command prompt. When run this way, log messages will output to the command window.
Security Considerations
pgAgent is a very powerful tool, but does have some security considerations that you should be aware of:
Database password
DO NOT be tempted to include a password in the pgAgent connection string - on Unix systems it may be visible to all users in 'ps' output and in your startup script, and on Windows systems it will be stored in the registry in plain text. Instead, use a libpq ~/.pgpass file to store the passwords for every database that pgAgent must access. Details of this technique may be found in the PostgreSQL documentation.
System/database access
all jobs run by pgAgent will run with the security privileges of the pgAgent user. SQL steps will run as the user that pgAgent connects to the database as, and batch/shell scripts will run as the operating system user that the pgAgent service or daemon is running under. Because of this, it is essential to maintain control over the users that are able to create and modify jobs. By default, only the user that created the pgAgent database objects will be able to do this - this will normally be the PostgreSQL superuser.
Jobs
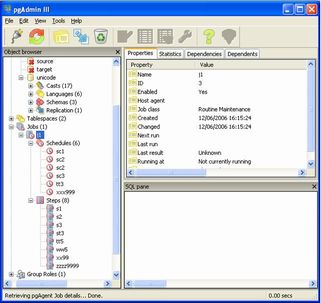
A Job consists of one or more Schedules against which the job will be executed, and Steps which define what the job is. To configure a new job in pgAdmin, browse to the server on which the pgagent schema was created, and find the Jobs node in the treeview. You can create jobs under this node in the same way as you would create any other type of object in pgAdmin by right-clicking the Jobs node and selecting the New Job option or by right-clicking an existing job and selecting Properties.
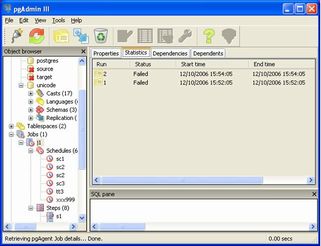
Statistics for your jobs can also seen on the Statistics tab in the main pgAdmin Window. This will show you the start and end runtimes of previous instances of the job, as well as the status when it was completed.
Creating or Editing a Job
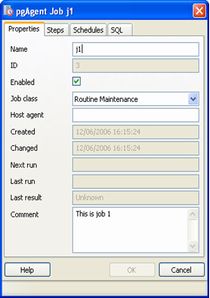
Jobs are created and edited in the familiar pgAdmin Properties dialogues. Jobs themselves are very simple - the complexity is in the steps and schedules. When configuring a job, we specify the job name, whether or not it is enabled, a job class or category, and optionally the hostname of a specific machine running pgAgent, if this job should only run on that specific server. If left empty (which is normally the case), any server may run the job. This is not normally needed for SQL-only jobs, however any jobs with batch/shell steps may need to be targeted to a specific server. A comment may also be included.
Note: It is not always obvious what value to specify for the Host Agent in order to target a job step to a specific machine. With pgAgent running on the required machines and connected to the scheduler database, the following query may be run to view the hostnames as reported by each agent:
SELECT jagstation FROM pgagent.pga_jobagent;
Use the hostname exactly as reported by the query in the Host Agent field.
For convenience, Schedules and Steps can be created and removed from the corresponding tabs on the job dialogue.
Creating or Editing a Schedule
Each job is executed according to one or more schedules. Each time the job or any of its schedules are altered, the next runtime of the job is re-calculated. Each instance of pgAgent periodically polls the database for jobs with the next runtime value in the past. By polling at least once every minute, all jobs will normally start within one minute of the specified start time. If no pgAgent instance is running at the next runtime of a job, it will run as soon as pgAgent is next started, following which it will return to the normal schedule.
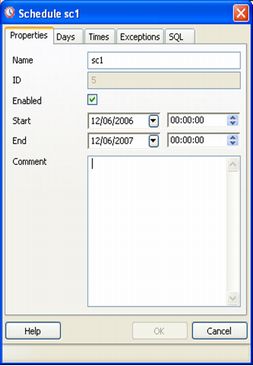
Each schedule consists of the basic details such as a name, whether or not it is enable and a comment. In addition, a start date and time is specified (before which the schedule has no effect), and optionally an end date and time (after which the schedule has no effect).
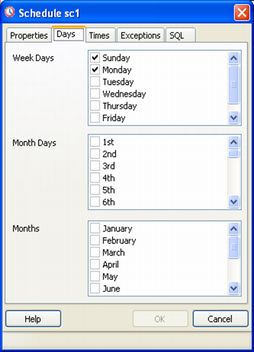
Schedules are specified using a cron-style format. For each selected time or date element, the schedule will execute. For example, to execute at 5 minutes past every hour, simply tick '5' in the Minutes list box. Values from more than one field may be specified in order to further control the schedule. For example, to execute at 12:05 and 14:05 every Monday and Thursday, you would tick minute 5, hours 12 and 14, and weekdays Monday and Thursday. For additional flexibility, the Month Days check list includes an extra Last Day option. This matches the last day of the month, whether it happens to be the 28th, 29th, 30th or 31st.
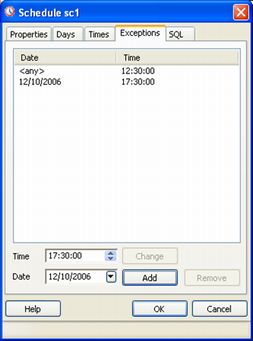
On occasion it may be desirable to specify an exception for a schedule - for example, you may not want a schedule to fire on a particular national holiday. To achieve this, each schedule may have a list of date and/or time exceptions attached to it. If a schedule lands on an exception, that instance will be skipped, and the following occurrence will become the next runtime.
Creating or Editing a Step
Each Job consists of a number of steps, each of which may be an SQL script, or an operating system batch/shell script. Each step in a given job is run in turn, in alphanumeric name order.
Steps may be added to a job through the job properties dialogue, or added as a sub-object. The Properties tab of the main pgAdmin window will display details of the selected step, and the Statistics tab will display details of each run of the step, including and output or errors from the script.
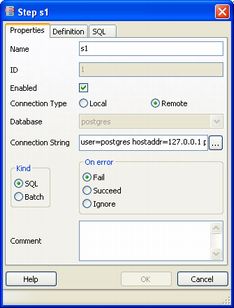
Each step consists of the details shown on the screenshot below, most of which are self-explanatory. If Kind is set to SQL, then it goes without saying that a database against which to run the script must be selected ? either a database on the current server may be selected, or a connection string may be specified which may be useful for running jobs against a Hot Standby server, a feature that will be available in PostgreSQL 9.0. If set to Batch, the database/connection string should be left blank. The On Error option controls how failure of this step will affect the status of the overall job.
The Definition tab contains a single text box into which the step script should be entered. For SQL steps, this should be a series of one or more SQL statements. For batch jobs, when running on a Windows server, standard batch file syntax must be used, and when running on a *nix server, any shell script may be used, provided that a suitable interpreter is specified on the first line (e.g. #!/bin/sh).
Conclusion
pgAgent offers a simple to use, yet powerful job scheduling solution for PostgreSQL users. It provides a convenient way to automate scheduled maintenance or data processing tasks which can be managed using the familiar pgAdmin graphical user interface.
